Monday, January 31, 2011

Le Cage Aux...BIRTHDAY! (SU only)


Hello my friends! It is back to the grind I guess. Happy Monday to ya! I have a darling card to show you today. I hope it makes a January Monday a little brighter for you. The sentiment is from the new SAB set called So Happy for You but everything else can be found in the regular catalog. Take a look and I will tell you more in just a minute.
And here is an angled shot for a different perspective:
Since we had a little burst of warm weather this weekend, I was in the mood for some bright color and a little whimsy. That cute little bird cage image is from the set called Aviary. I bought it to demo a while before Christmas and it sat, unloved & uninked all this time. For shame! It is too cute to just sit! I combined it with prints from the Build A Bear Pawsitively Prints DSP and a few embellishments and voila!... a sweet and simple birthday card to have on hand. The set includes several different birdcages and various birds to go in them. They all mix and match well and lend themselves perfectly to embellishment. Here, I added a brad (Tempting Turquoise from the Brights brad assortment) to the top of the cage and a little ribbon (1/4" grosgrain in Daffodil Delight) to the cage pole. The red trim down the side of the card was made by punching a strip of Poppy Parade with the Dotted Scallop Ribbon Border punch. Last but not least, the 2 little red buttons are from the Brights button assortment.

I think that does it for me today. Check back tomorrow for another new card using another print from the Springtime Vintage DSP. Have a great day!

Sunday, January 30, 2011

Black Tie Optional Thank You Note- SU only card

Hello folks! I have a card for you today that uses tons of supplies but it is much easier than it looks. It is one of those projects that you might look t and decide that it is way too complicated but it only looks that way. It is in reality a card that gives a lot of bang for the buck...the kind that a recipient thinks you slaved over but in fact, you moved on to watching more TV sooner than they think. Check it out!
And my customary side shot for extra detail:
This is a card that I designed years ago, using non-SU materials. I may have even blogged about it before I became a demo for SU. Well, it has always been a fav and I kept the sketch in my card journal. I came across it the other day and knew that it could be reworked, using SU products and give an equally dramatic result. The Love Letter DSP has not let me down yet! This paper pack is so versatile despite the fact that it only coordinates with 3 colors. I have used it on fun/whimsical cards as well as more formal projects and I just love it. Here, it is combined with Chantilly Lace Trim, Basic Pearls, and Distressed Paper Daisies for a vintage look. I sponged the edges of the various layers with Tea dye ink (included in this year's brand new Distress Kit) to further age the materials. The focal point image is cut with my Big Shot and the Sizzlet Little Leaves die. I stamped the sentiment with the thanks tag included in the Perfect Punches stamp set and then punched it out with the coordinating Scallop Oval punch.

This card is a perfect example of how a little embellishment can bring a relatively simple project up to a whole new level, huh? Sometimes I quit at just the basics when just a little more effort gives it the WOW factor. For more info on this card or the products I used, please ask! I would be glad to help. Enjoy the rest of your weekend!

Saturday, January 29, 2011

Just For You- SU only card

Hi guys! We made it to the weekend! My endless week of doctor's appointments, root canals, and school obligations is OVER. I am looking forward to spending the weekend resting and playing in my scramp room. Today's card is perfect to kick this weekend off too since we are expecting warm, springish weather. I think a few spring flowers are just what I need! Take a look...
And since I think it is easier to picture a project online when you can gain a little depth perception...
This card uses my new favorite paper pack, the Springtime Vintage DSP, and one of my favorite color combos, green and blue. The flower images are from the new SAB set called Sweet Summer. I colored them with my blender pens and reinkers which is still very difficult with my hand in a brace. The sentiment I chose to use is from the Level 1 Hostess set called Afterthoughts.

I wanted to showcase the gorgeous print paper as much as the images so I wanted an arrangement that gave me both. I finally decided on the Sizzix Oval Scallop Frame die cut with my Big Shot machine. For embellishment I added a length of Very Vanilla 5/8" grosgrain ribbon along with a couple Certainly Celery Designer buttons (included in the Subtles assortment.) Even though the assortments of buttons and ribbon color choices don't include all 45 colors, the selections are carefully chosen to give you the most versatile colors in the palette. The leaves were colored with Old Olive but they harmonize well with Celery buttons. You get tons of combinations for your projects this way!

I think that about sums it up for today. I have several other cards made ahead so check back for lots of fresh ideas to come. Have a great weekend!

Thursday, January 27, 2011

Spring Friendship Greeting- SU only

Hello everyone! Can you believe it is finally Thursday? We are in the home stretch of this grueling week. For us, it has been a week filled with doctor's appointments and events at the schools with the kids. I am pooped! I have a cute card for you today though. To me, it is a reminder that pretty springtime will be here before we know it. Here ya go!
And a detail shot:
This is one of those cards that I changed 406 times before I finally nailed it down. Do you ever start out with an idea and when you get it started with actual paper, some part of it is just not right and you know it needs to be changed but you can't figure out what to change? Well, this was it. I started out with Concord Crush and another image from one set I used here, Just Believe.

Now that it is in its final state, I can tell you about it though. ;) I stamped the Old Olive background with the tiny butterfly image from Sweet Summer. This is a new Sale A Bration set that I love. I will be using several more images from this very versatile set. Next I embossed a strip of Whisper White with the Square Lattice embossing folder and my Big Shot machine. The top edge is trimmed with a punched (Scallop Border Punch) strip of Daffodil Delight Designer Patterns DSP. The image is from Just Believe, as I mentioned above. I hand coloredthe stamp itself with my Olive and Daffodil markers before stamping onto Whisper White CS. This little image has a double line border so I carefully cut between the 2 lines with my Paper Snips which are perfect for fussy cutting like this. I stamped another copy of the image in Daffodil ink onto CS of the same color and trimmed it by hand too. This time, I trimmed around the outside of both line borders. Before attaching it to the card, I added a little Linen thread and an Old Olive Designer button which is included in the Brights button assortment. The sentiment is a separate image from the floral tag image so you could customize this card to any occasion. The final touch is 3 little Pearls from the Basic Jewels collection.

Hope you like it and it inspires you to get creating with some of the fabulous new items available from Stampin' Up! As if the regular Idea Book and Catalog wasn't enough! They come out with so many new pretties in the Mini and the Sale A Bration catalogs too! That sweet little butterfly image as well as many others can be yours for FREE when you order just $50 worth of Stampin' Up! merchandise. You can also earn FREE stuff by hosting a qualifying workshop. Contact me to learn more!

Wednesday, January 26, 2011

Springtime Vintage Get Well Soon- SU only

Hi guys! Super quick post because I have a dental appointment in less than an hour so I have to fly but I wanted to pop in with something for you to see. I will post the photo and give an update later on the details. OK? Also, I wanted to mention that Sale A Bration has begun! The biggest savings of the year can be yours! With every $50 purchase, you earn one free item from the SAB catalog.

Now for the card...
And a shot from the side for more detail:
I will tell you all about it as soon as I can. Have a great day and think of me as I get my first root canal! ;)

Edit: I am back from the dentist and had a nap to let my poor tooth calm down a bit. Now I can tell you about the card. I will start at the back and work forward.
-Crumb Cake background is embossed with the new Framed Tulips embossing folder (Occasions Mini) and my Big Shot machine.
-The center panel is a layer of Pink Pirouette CS topped with Always Artichoke CS and then a piece of the new Springtime Vintage DSP.
-I made the flower with the new Blossom Petals punch. Each petal is punched from Pink Pirouette CS and then sponged with Rich Razzleberry ink. The leaves are the same petal shape but turned in the opposite direction.
-The center of the flower is a Crumb Cake Designer button which is included in the Neutrals set of buttons. I tied it off with a length of (non-SU) DMC #739 Pearl embroidery cotton and attached it with a glue dot for stability.
-The sentiment, which is part of the Sincere Salutations stamp set, is stamped with Rich Razzleberry ink onto Very Vanilla CS. I trimmed the tag with more Pink Pirouette CS and then it sits on a punched piece of Always Artichoke CS which has been punched with the Scallop Ribbon Border punch.

Hope you like it! Ask any questions you may have if I didn't explain enough for you. I am always glad to help. :)

Monday, January 24, 2011

Cupcake Birthday Wishes- SU only

Hello folks! Happy Monday! I hope everyone had a fantastic weekend. Mine was busy but nice. I got a little time to work on cards as well as the pile of "to-do" on my desk. I am certainly ready to have my hand back. This broken wrist business is for the BIRDS. I miss teaching and preparing classes. I miss making cards all by myself. And most of all, I miss cooking for my family. My fabulous husband is doing a bang up job but I know he is ready to get back to our routine too. Double duty can't be all that fun for him either. Anywho, enough whining! I have an adorable card to show you today and it was an easy one to make too. Wanna see?
And a shot from the side to show you more of the texture:
I saw this general idea on a blog somewhere but when I sketched it out in my journal, I somehow missed making a note of whose idea it was. If anyone knows where it came from, please let me know and I will gladly give credit. I have searched all the blogs in my bookmark list and no luck. Help me if you can!

Back to the card once again...the card background was run through my Big Shot with the Perfect Polka Dots embossing folder and the cupcakes were punched with the new SU Build A Cupcake punch. The bottoms of the cupcakes are also stamped using the new Create A Cupcake stamp set. I added the "sprinkles" image but the tops overall are not stamped. I made the tower by punching a strip of Melon Mambo with the Eyelet edge punch. Then, I cut just a plain strip for the center post. The decorative little swirl base was cut with my Big Shot and the Swirls and Scribble Sizzlet die. I ran it through twice to get 2 of the same swirl portion.

My color scheme is Melon Mambo, Pink Pirouette, Crumb Cake, and Whisper White. That cute little tag that says, "birthday wishes" was made by coloring just a portion of a sentiment from the Longfellows hostess set (with an Early Espresso marker) and then punching it out with my Word Window punch. I just trimmed off one end and matted the remainder on Crumb Cake CS. It is attached with a white brad which comes in the Neutrals brad set. So simple but so cute! By changing the color scheme, you could make this card appropriate for either gender and the sentiment could be changed to fit the occasion as well.

That's it for me today. I will be working on preparing the Hostess Club order to go in tomorrow, the first day of Sale A Bration. The biggest SU sale of the year is almost here! I can't wait to earn a few SAB goodies myself. Remember, for every $50 you spend until March 31st, you get to chose an item from the SAB catalog. You can also earn an item by hosting a qualifying workshop. Ask me more if you interested in earning FREE stuff for yourself. Who doesn't like free?

Sunday, January 23, 2011

Last Filled with Love Card- SU only

Hi folks! It has been crazy busy around here so today will be another quick post. My card today was inspired by a design on Andrea Walford's blog. I loved her card so I decided to incorporate the elements I loved and adapt my design to the materials I had on hand. Blogger is acting a little nuts so I am unable to link to her site to give credit but I certainly have a photo of my card to share with you. I felt like it was a perfect choice since the Filled with Love Bundle promo ends tomorrow. Here ya go!

And a detail shot so you can a little bit more of the embellishment:
I used Filled with Love to stamp the heart flowers in Poppy Parade ink and then the leaves were stamped with Petal Pizazz in Pear Pizazz ink. Each little heart blossom is accented with a Bitty Button. I lightly sponged my Whisper White background with Bashful Blue ink and then just a touch of Tempting Turquoise around the very edge for definition. The "grass" was created by punching 2 strips of Pear Pizazz with the Scallop Trim Border punch and then inking the top edges with Pear Pizazz ink. I stamped the sentiment (also from Filled with Love) in Basic Black ink. I punched the wording out with my large oval punch and lightly sponged with more Bashful Blue ink around the edge. A few of the hearts and leaves are popped up on Dimensionals too.

I skipped the links to certain products in the interest of time but all the productsI used can be found in my online store. Items included in the Filled with Love bundle can be ordered until close of business on the 24th. You may order online or contact me to order.

I have an adorable new card to show you so check back in tomorrow to see another use for the new Create a Cupcake stamp set along with the Build a Cupcake punch. Have a great day!
Friday, January 21, 2011

Hello, Hello!

Hi guys! Yesterday got away from me and before I knew it, it was too late to blog or even keep my eyes open for that matter so I waited for today to show you my cute little card. I also have a few photos of a project I made to show my hostess club girls. I'll show the card first. Here goes...
This is just a simple "hello" card...one of those all occasion friendship cards that are great to have on hand. I made it because that owl is just too cute and I couldn't resist making him with a cute little red vest. The tree branch he is on comes from Season of Friendship and the sentiment is from Hello Again. Both are regular catalog merchandise. I am going to skip the links today but all items can be found in my online store. The color scheme is a fav of mine and I have it listed in my color coach which includes several blank pages for keeping your own color combos. The colors are Concord Crush, Poppy Parade, So Saffron, and Old Olive.

Next up are my little Valentine's treat jars. I had lots of scraps left from all my Filled with Love bundle projects so I trimmed a couple glass jars left over from my husband's lab at work. Take a look...
Here is a close-up of the top so you can see the little tag (from Birthday Bakery stamp set):
And then a close up of the taller one so you can read the tag on the front:
Aren't they darling? They both were so easy to make too. Even though you probably can't duplicate the exact containers, I wanted to show you that just about anything can be made cuter with a little bit of embellishment. These are ready to add a little bit of candy and I have 2 precious Valentine's Day treats.

That's it for me today. Check back this weekend because I will have some new projects to share as soon as I photograph my work. Happy weekend!

Wednesday, January 19, 2011

Create A Cupcake Card

Hi folks! Here we are at Wednesday and the week is at the half way mark. Where does the time go? The week is flying by! Tonight is the last Hostess Club meeting for the first half of the catalog year. We have had lots of fun and I hope they choose to go another round. I will probably try to come up with a simple project, despite my hand limitations. I get lots of help from my family to make and photograph cards as well as getting this blog done every day so I am little leary of trying to teach a project without their help. We'll see I guess!

For today though, I have a new card featuring a brand new punch and stamp set from the Occasions Mini catalog. These 2 together are way too much fun and may just be my new favorite products to use. Wanna see?
I have mentioned recently how I needed more gender neutral birthday cards so I have been on a mission to think of new man-safe cards. This one works, IMO. The stamp is from Create A Cupcake and I punched the top and the cherry with the punch called Build A Cupcake. The punch has several options. I could have cut a candle, or sprinkles, or even the cupcake bottom too.

I kept the color scheme simple. The image is stamped on Very Vanilla CS. The card base is Crumb Cake with some polka dots (from the Confetti stamp set) stamped on in the same color. I used Early Espresso to trim the various panels and give definition. That gorgeous red grid paper comes from the Love Letter DSP. A button, some ribbon, and a little punched trim finish it up. Another card made and ready to go!

You know the drill...call me/mail me if you need me. Have a great day!

Tuesday, January 18, 2011

Last Week for Filled with Love Bundle!

Hey guys and gals! Well, gals I am pretty sure but not so much on the guys part but anywho...We have one week left to take advantage of the SU Filled with Love Bundle of goodies. Today's project uses an image from the Filled with Love set so I thought it was a perfect reminder that you don't want to miss that cute set and papers. And don't forget about the freebie package of Bitty Buttons! To learn more or to place an order, you can click on the Filled with Love button in the left sidebar here or just contact me. Now, for the project? Here ya go...

This was really hard to photograph but I hope you can see that it is made from punching 4 Decorative Labels and then making a very simple box platform to hold them upright. A length of Real Red 1/4" grosgrain ribbon gives it extra stability. I decorated it with a little circular image from Filled with Love and then added a handle (made with the Dotted Scallop Ribbon border punch) and a tag. The sentiment comes from a new set in the Mini catalog called XOXO. You can't see it in the photo but the handle is glued down with Tombow Multi Purpose Adhesive and then topped with a small heart punch and then the back has another embellishment like the front. So easy and so cute! It took less than 20 minutes so if I make several for my kids' teachers, it won't take me days. LOL!

That's it for me today. It is my first day of everyone being back to school and work so I have bunches to do. Have a great day!

Monday, January 17, 2011

New Bold Blossom Card!

I love using new stamps and materials! I know it is silly but I always remember how I used something the first time too. I look at a card or project and know that when I made it, I was using such and such for the very first time. Goofy, I know. Breaking open new stamps is especially fun. The images never look quite as good in a catalog or on the package. Inking them up in a color of your choice makes them yours. LOL!

Today's card uses a brand new set from the Occasions Mini called Bold Blossom. It is one of those sets that I can see myself using for years...a go-to set that becomes a must in your collection. It is simple but still a lot of fun and I simply love sets that make the flower separate from the stem. I am not a huge fan of masking so when I can ink up the stem/leaves in a lovely green and make the flowers another color easily, I am sold! So, take a look and I will explain in a minute.
My color combo here was inspired by my Color Coach which may just be the most underutilized tool in the SU catalog. I have been a fan of the new changes (made in July for the new catalog) since it premiered. I love the little blank cards to keep track of personal fav combos too. If you haven't taken a look at that thing lately, check it out here.

The colors I used on this card are Pear Pizazz, Real Red, Concord Crush, and Marina Mist. And can I just say I love the In-Colors this year? I use Pear and Concord together a lot. The sentiment here is also included in the Bold Blossom set making it an all in one deal...no searching for another stamp for your wording, right? I drew the flight pattern for the butterfly with a black marker. The centers of the flowers were punched with a standard 1/4" hole punch and then topped with Crystal Effects. Very simple! And another thank you note is made for a rainy day!

Sunday, January 16, 2011

Simple Birthday Wishes- SU only card

Hi guys! Hope your weekend is wonderful so far. Ours has been really busy. Yesterday was simply nuts. I am looking forward to sitting down at my desk and playing with large quantities of stamping stuff as soon as possible this afternoon. You should do the same! ;)

Today's card is extremely simple but I bother to post it because I wanted to mention something we all need to remember. Sometimes, we get caught up in the latest materials and techniques and think our projects have to be bigger and better in order to share with others. Well, every time I end up giving a card that I worried was too simple, I am reminded that the "non-stamping" world doesn't have a clue what the latest "stuff" is all about. They just love that someone thought enough of them to actually make a card for them. Remember this the next time you are in need of a card and think you don't have time to make one. Take a look...
This card took me less than 15 minutes to make. It was probably closer to 10 minutes actually. Really! I picked one of my favorite prints from the Greenhouse Gala DSP and paired it with matching card stock, which in this case is Baja Breeze. A couple Paper Daisies accented with some ribbon (retired So Saffron 5/8" grosgrain) and a button are all I used for embellishment. The sentiment could be anything you chose here but since I needed a birthday card, I used that perky little "birthday wishes" image from the new SAB set called So Happy for You. Finished! Easy peasy! See? We really don't have an excuse to buy a card. Ever. ;)

Friday, January 14, 2011

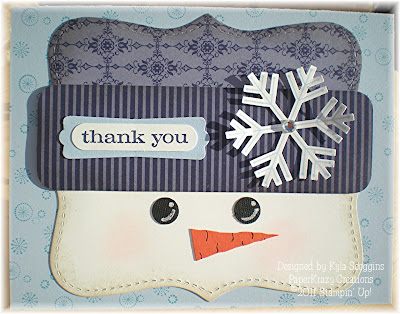
Snow Much Fun! SU Top Note Snowman Card

Hello everyone! Today's card is in honor of the fact that my kids and hubby are home for the 5th day in a row due to our little snow storm. I wanted to wait to post it until I had mailed them out but Frosty is too cute and I can't wait anymore. This card is my post holiday thank you note so if you get one in the mail, thanking you for your kindness over the holidays, and you read my blog, just pretend it is all new to you. OK? ;)

So, here he is...
This idea was CASEd from another demonstrator named Diane Simpers, here on her blog. I saw this little guy and immediately pulled out the supplies to make my own. Isn't he cute? I always like a snow themed post holiday thank you note and he really fits the bill, huh?

To create him, I used my Big Shot machine and the SU Top Note die to cut 2 notes...1 in Whisper White CS and 1 in Concord Crush Patterns DSP. Then I cut a rectangle slightly wider than the top note and about 1 1/2" high. For this, I used the flip side striped pattern of the Concord Crush DSP. The card base is Bashful Blue and I stamped an all over background using the Confetti stamp set and Marina Mist ink.

The snowflake on his hat band was made by stamping the Simple Snowflake image in Bashful Blue and then punching it with the Snowflake punch. I added a Jewel Rhinestone to the middle for a little sparkle. The sentiment is from the Just Believe set. I stamped it in Concord Crush ink and then punched first with the Word Window punch and then placed it on top of a punched Modern Label in Bashful Blue.

A few scraps of Basic Black (and an Itty Bitty circle punch) for his eyes and Tangerine Tango to make his nose along with a little sponging of Sahara Sand ink finish him up. It sounds like a lot of steps and tools but he really was easy to make. You could also improvise and personalize him how ever you wish too.

For more info or to order Stampin' Up! products, please contact me anytime. I would be glad to help!

Thursday, January 13, 2011

A Look at Rub-Ons (SU only card)

Hi guys! Since today is day 4 of having my hubby and kids home because of the storm, it will be another brief post. As a matter of fact, I will even skip the links to certain products and just trust that anyone who would like to know more will let me know. So, have a look and I will tell you just a tiny bit before dashing off to the day.
And then a different angle to show a little bit of the texture...
The reason I wanted to call attention to the texture of the image is that it is a rub-on versus a stamped image. With rub-ons, not only do you get a silky paper surface but you also get multi-colored detail that just doesn't happen with stamps. I know that I would probably never bother with coloring a stamp in 3 different colors on such tiny areas and I love to color! This set of rub-ons is called Birthday Party and as you can see, it coordinates beautifully with the Celebrations DSP. I love these colors together and I think they are great for either gender as well as birthday boys and girls of all ages.

The sentiment I used is from the Perfect Punches set and I punched it with the wide oval punch. A strip of Pear Pizazz CS through my Ribbon Border punch and a couple Whisper White buttons and this card was finished in a flash.

Check back tomorrow to see another new card using a set from the Occasions Mini catalog. Ciao for now!

Wednesday, January 12, 2011

Valentines A Plenty

Howdy! Another quick post today...playing catch up again. I have 2 cards for you today so I'll get right to the point!
This first one is a super simple greeting but still a lot of fun in my book. I can't wait to send it! The focal point image is an a'la carte image featured in the Mini catalog. It is called Be My Valentine and it caught my eye as soon as I thumbed through the new mini catalog. That floral background reminded me of pretty lace and I couldn't wait to use it just like they did in the SU example photo. I also love to be able to buy just one image now and then. First, I stamped the image in Rose red onto Whisper White CS and also once in Basic Black onto Crumb Cake CS. Then, I trimmed out the banner portion of the image and paper pieced it onto the red copy. Easy peasy! It is finished off with a black designer button and a little bit of linen thread before mounting it onto my card foundation of Crumb Cake CS. The Rose Red polka dot print is from the Subtles Patterns DSP. The white lace border is punched with the Eyelet Edge Border punch.

Now, onto the 2nd card for today...
This one may look familiar. I CASEd this one from the Filled with Love Bundle promotion brochure. I liked it so much that I made not one change. Well, actually I used Certainly Celery ribbon instead of Old Olive but I figured that out after the fact. I wanted to post it here because I wanted to remind everyone that SU catalogs and brochures are a GREAT source of inspiration. Who hasn't sat down to make a card and just drawn a complete blank about how to start? Well, sometimes all it takes is thumbing through a catalog or maybe a browse over the SU website to get your juices flowing again.

For further info about today's projects, just holler. I would be glad to point you in the right direction. Have a great day!

Tuesday, January 11, 2011

Just For You- SU Only Card

Hi guys! Really short post today...I have tons to do since my family is all home for our 2nd snow day. So, without further ado...

I will be very brief in telling you about it but as always, please contact me if you have any questions about technique or the products I used. This is an SU only card so everything can be found in the new Occasions Mini catalog or my online store. The flower was made with the gorgeous new set called Build A Blossom and then punched with the matching punch called Blossom Petals. That lovely print paper (which I promise I am not finished with yet), is the Springtime Vintage DSP. I used all 3 of these products on a card a few days ago and it had a very different look so as you can see, they are very versatile and can be combined for endless card styles. As for the rest, I bet you have seen them all before but ask me if you need to know more.

Check back in for several new cards coming up. I have more to show you using SAB and Occasions Mini products as well as a fun new birthday card using rub-ons and DSP from the regular catalog. I need to tweak my photos and they will be ready to post over the next few days. Have a wonderful day and stay warm!

Monday, January 10, 2011

A Little Bit of Vintage

Hello everyone! Happy Monday! We are home enjoying our snow day here at my house. My feet won't get warm but otherwise, I am lovin' life. I am goofing at my desk as much as my hand will allow and having a ball with my new stamp goodies that came Friday. Today's card uses some of those goodies as a matter of fact!

That lovely, dainty print paper is from the brand new Springtime Vintage DSP which just appeared in the Occasions Mini. These prints are delicious! I can't wait to use them all. I paired this one with Always Artichoke and Pink Pirouette for my solids and then a Rich Razzleberry button and a length of Pretty in Pink 1 1/4" Striped Grosgrain Ribbon. The sentiment is from Curly Cute and I love how it fits into the Modern Label punch. A little bit of linen thread finishes the button embellishment and voila!

For more info about this card or about any of the SU products I mentioned, please contact me. I would be glad to help! :)

Sunday, January 9, 2011

Better late than never...but I'm thinkin' of ya!

Hi folks! I know it is getting pretty late in the day but I promise I had good reason. I am sitting down for the first time ALL DAY. Well, I sat for a minute to talk to a friend that popped by for a minute but we talked about SU so that doesn't count! The good news is that I got my card pictures taken before the light went away and the snow clouds came in. Today's SU Only card uses several new products and every one is better than the one before it. Wanna see?

So, where do I start? I'll start at the front and work back I guess. That lovely pink blossom is stamped with the ever-so-lovely set called Build A Blossom. This set, which debuted in the new Occasions Mini, is a 12pc set featuring various petal and leaf images that all build together to make flowers of all kinds. I see tons of potential with this set for the springtime. Mother's Day, Easter, wedding cards...you name it and this set would come in handy. I stamped my petals in Pretty in Pink Classic ink on Pink Pirouette CS. I punched them with the also new Blossom Petals punch. This set and punch are made to be used together but would also be great used alone. I love the frilled edge around the larger petals. It adds such nice detail IMO. To give a little dimension, I cupped the petals under on the bottom layer and upwards for the top layer of petals. The leaves were stamped in Certainly Celery Classic ink on Very Vanilla CS.

The next layers are the ribbon and the background layer. That lovely ribbon that has just a touch of shimmer is the new Baja Breeze Seam Binding. You may have seen the seam binding that came out for the holidays and now the new Mini includes colors to match your spring projects as well. This stuff is silky and very pliable. I also love that its sheer texture doesn't add a lot of bulk to cards. How about that background layer? Like that embossed border? Well, that is a new Textured Impressions Embossing Folder called Framed Tulips. I stamped the sentiment in Soft Suede Classic ink and used a new Sale-A-Bration set called So Happy for You. You can earn this set for FREE beginning on January 25th every time you purchase $50 in SU merchandise.

Well, folks, that about does it for this card. If you have further questions, let me know so I can help. Check back in for several new cards. I can't wait to show you all the new springtime goodies from SU!

Saturday, January 8, 2011

Thoughts of You Warm My Heart- SU Only Card

Happy Saturday folks! This was a never ending week. The weekend couldn't get here fast enough. So, it's here and I will get some time to just sit and play with my new stamps. Just yesterday, Mr. Brown brought me some goodies from the upcoming Sale A Bration catalog and a few new things from the Occasions Mini Catalog too. What I started last night isn't quite ready to photograph just yet so I will have it tomorrow. Deal?

For today's card, it is another red and pink confection. It also uses the Filled with Love set. Don't worry...I will move on soon. ;) Something new about the combo is that I used some of the relatively new Jewel Rhinestones. These were new to SU in July and I just never got around to ordering any. Well, I am so glad I finally did! Take a look...

I only used a few rhinestones up around the top of the heart to accent just a bit. I also used a Bitty Button (FREE with Filled with Love Bundle!) and alength of the Real Red 3/8" Taffeta Ribbon. This is a great ribbon for bows and cards. It is so sheer and smooth, making it very flexible, that I find it much easier to tie into a pretty bow than many others. I am gradually buying all the colors offered because I like it so much.

The heart image and sentiment are both from the Filled with Love set. That fun pink polka dot print is from the Love Patterns DSP which comes with the bundle too. For the little tag flag, I rounded both the corners on one side and then notched the other end with my Paper Snips. I think that about sums this cadr up for today. Check back tomorrow for some truly NEW items used on my card. I think you are going to like what I have to show you! There just isn't much on the card that isn't new, new, new. Have a wonderful day and stay warm!

Friday, January 7, 2011

Be Mine, Be Mine, Be My Polka Dotted Valentine!

Hello folks! Quick post today because I have piles to do before our possibly snowy/icy weekend. It would be nice to get more snow and just sit around with my kids and some cocoa but in order to do that, one must actually have cocoa and other essentials like TP, and Doritos in the house. So, Walmart here I come! Before I go though, let me show you today's card. I am pretty happy with it!

This one is a little less whimsical and maybe a little more...dramatic? For lack of a better word? I tried something new here. I used my SU Riding Hood Red reinker to dye a Paper Daisy. Usually, I am too lazy to dye my flowers to match and I end up changing my design to accommodate plain white blooms. Never again! Just take an empty plastic container from SU buttons, brads, etc. Add a couple tablespoons of water and then a few drops of your desired reinker color. The amount of both depends on how deep you want the color to be on your project. Let it soak for a few seconds and then remove with tweezers since the dye will stain your fingers. Let the blossom dry completely on some paper towels before adding to your card.

Once my little flower was dry, I made my card using the very dramatic polka dot print from the Love Letter DSP. Basic Black and Very Vanilla along with Riding Hood Red CS were my solids. The sentiment is from the Filled with Love set. I wasn't lying the other day when I said it was my new favorite, huh? That set is seeing quite a bit of action lately! The leaves were cut using the Sizzix Little Leaves die and my Big Shot. A Filigree Designer Brad and a length of 5/8" Basic Black grosgrain ribbon finish it off. I substituted a black brad for the silver brad that comes with the Filigree set.

I'll skip an actual supply list today since I named everything in my text but of course, if you have any further questions, please ask. All materials used are Stampin' Up! Have a great day and please stop back by this weekend because I have a few new goodies from the occasions Mini Catalog on the way via UPS and I WILL be playing with them over the weekend. ;)

Thursday, January 6, 2011

Red and Pink Together?

The only time of year that I would ever put red and pink together is Valentine's Day. What is it about that combo that is so hideous in fashion or even cards that makes it ok to use it until the middle of February? Well, I use it with gusto this time of year to take advantage of that small window of opportunity. In case you haven't figured it out, today's projects wear their red and pink together with pride LOL! Take a look...


And a gift tag featuring some of the adorable, new Love Impressions Valentine's rub-ons:

Aren't they cute? For the card, I used 2 prints from the Love Patterns DSP along with Real Red and Pretty in Pink CS. These papers along with the stamp set I used, Filled with Love, can be purchased in the Filled with Love Bundle Promotion which lasts until January 24th. Don't forget about the FREE package of Bitty Buttons you get with the bundle!

Along with the Love Impressions Valentine's rub-ons, the tag includes an image from Perfect Punches stamp set. This set is one of the most versatile I have ever purchased. Every image coordinates with a punch! The button at the top was a leftover from a retired set but SU still makes buttons in that color so no worries if you need Pretty in Pink buttons!

For more info about these SU Only projects or to order the materials needed to make them, please feel free to contact me anytime. Have a great day!

SU Materials: Papers- Real Red CS, Pretty in Pink CS, Love Patterns DSP, Whisper White CS. Ink- Real Red Classic, Pretty in Pink Classic. Stamps- Filled with Love, Perfect Punches. Accessories- Love Impressions Rub-Ons, Designer Buttons, Pretty in Pink 5/8" satin ribbon, Eyelet Edge Punch, Ticket Corner Punch, Round Tab punch, Sm Heart Punch, 3/4" Circle Punch, Linen Thread.

Wednesday, January 5, 2011

All You Need is Love, Love...

Hi guys! I made it back 2 days in a row! It has certainly been a while since that happened, huh? Well, it felt so good to come back and post yesterday, after a way-too-long hiatus, that I was in a real hurry. I have a really cute, SU only, card to show you as well as some SU news. Card first and news last, ok?

You like it? I am pretty happy with it. Considering I have been out of card making commission since early December, making it was a little like Nirvana. I'll tell you a little about it and then I will move on to my SU news. That fun print paper behind the love birds is a new Designer Series Paper from the also new Occasions Mini Catalog which started yesterday. It is called First Edition and you will be seeing it often. I LOVE it. I really like that the writing is small so that it becomes more of a texture versus an overwhelming visual weight in the background of your project. You get a lot for the money too...this paper pack includes 24 sheets which is double what the regular DSP packs include.

Another fun feature of today's card is the sentiment which is part of the Filled with Love stamp set. This set is my new fav and it might be yours too. It is so versatile! From now until January 24th, you can take advantage of the Filled with Love bundle deal which includes the Filled with Love stamp set, Exclusive Love Patterns paper pack and a FREE package of Bitty Buttons. You can learn more about the bundle deal right here, on my SU website. The set itself was featured on the last page of the Holiday Mini catalog.

The cute little love birds were made using the Extra Large 2 Step Bird Punch. The red one is punched from a sheet of Patterns Designer Series paper in Riding Hood Red and the blue one is stamped first in Not Quite Navy ink on card stock of the same color and then punched. The branches are punched from Wild Wasabi textured card stock. If there is anything else you would like to know about this card, just ask!

Now for the SU news...as I mentioned above, the Occasions Mini Catalog went live yesterday. If you would like to receive a copy of the Occasions Mini, please let me know and I would be glad to send you one. You can also download a copy from my SU website as well. For those that regularly attend my classes, you should have already recieved your copy in the mail. It is filled with all sorts of new and exciting products that you are sure to love. I will be showing several of them here so stay tuned.

That's it for today folks. I am off to elevate my little ole hand. Typing gets old really quick. Have a great day!

Tuesday, January 4, 2011

It's Been Awhile!

Hey folks! I found my way back to Blogland once again. I have missed this place so very much and decided that it was high time to fit it back into my schedule. If you used to visit, you may remember that I started demonstrating for Stampin' Up! last spring. Well, I am still doing that and LOVING it so as I begin again here, the direction will take a slight turn. My creations will feature primarily SU products and I hope to make my posts more of a source of information (and hopefully inspiration!) about how to actually create the projects for yourself versus just a list of my materials. I also plan to include information about various SU products and promotions as they appear.

So, that being said, I hope you will continue to find your way back often as I post some great new examples and ideas for spring projects. I am in a cast for a fractured right wrist but with a little help from my family (and a slight home made adjustment to my cast :O), I am back to creating on a limited scale. I hope to see some familiar faces from my last stint of posting and also hope to see a few new faces belonging to the many fun folks I have met through SU. So hang on for a Krazy ride and let's get to it!