Showing posts with label Easter. Show all posts

Thursday, February 24, 2011

A Few Good Eggs

Hi guys! I had to take a few days off due to "hustle and bustle." My kids couldn't be any busier lately and since I operate the taxi, well... ya know. So, I have a card to show you but I am going to hurry so if there is a detail I leave out, just ask. Here ya go...
To make this card, I started with A Good Egg which includes this large, blank egg shape as well as various patterns to decorate the egg. I masked the egg shapes in succession so that the illusion of depth occurred and also so I could get the patterns inside the egg borders and make it look more realistic.

I have been experimenting more with masking because it has always been a technique that stumped me. I try it and am rarely happy with my results. Well, recently, I attended a rubber stamping show and realized that the look I love in stamped images is often achieved with masking so I am working to get more comfortable with it. Just keep swimming...

Only A Good Egg was used as far as stamps on this card. The green panel is a strip of Designer Patterns DSP in the Subtles assortment. I added a punched layer of Pink Pirouette CS that I ran through the Eyelet Edge punch. The finishing embellishment is a Designer Flower Brad to which I added a pink center.

That does it for me today. I am off to a doctor's appointment and more errands before my hubby starts his new job. It has been WONDERFUL having him home for a month but we have run ragged trying to get things done since it will be a while before we see a real vacation again. I'm off. Have a great day for yourself!

Saturday, February 19, 2011

First Easter Card of the Season!

Hi guys! I have to hustle with some muscle today but I just had to show you a card I made recently. I am excited about it for 3 reasons: (1)It is the first Easter card of the year, (2) I tried a new technique, (3) and it uses a very favorite set of mine that I finally bought for myself. Wanna see?
And a little bit from the side so you can see more texture:
See that cute little flower? Well, I decided to try my hand at using SU tools and materials to create a few of these fabulous dimensional flowers that are everywhere. This little guy actually uses the Itty Bitty Punch Pack flower image along with 2 "candle" shapes punched with the new Build A Cupcake punch (for leaves) and a (non-SU) 1/8" hole punch. I trimmed a freehand spiral into the middle of the shape and then cupped it slightly with tweezers. It is secured with a mini glue dot. It was really tiny to work with but not impossible if you wanted extra detail on a project.

The 3 precious chicks are stamped from A Good Egg which is a perennial fav from the regular catalog. I stamped them in Basic Gray ink onto both Whisper White and a piece of DSP from the Pawsitively Prints assortment. After a little trimming and reassembly, they get even cuter, huh? Their beaks were added by stamping the face part of the image onto scraps of Pumpkin Pie CS and then trimming. This technique is called paper piecing and is an excellent alternative to coloring your images. It gives texture and dimension as well as introduces pattern into the project where coloring and stamping alone would not. The grass was cut freehand but you could also use the egg stripe image in the set to get a good outline guide too.

I added a quick sentiment, from the same set and we are done! Pretty simple and just waiting for Easter to roll around. Have a wonderful weekend and check back in for more springtime cards using new and exciting materials. I can't wait to share!

Thursday, February 10, 2011

Springtime Vintage Easter Bonnet

Hello gals! I have an adorable project to share today. I am very excited to show you. I saw it somewhere online and once again, can't remember who and can't find my notes. So, if you recognize this project, please fill me in and I will gladly give credit. Wanna see?
Isn't that too cute? Here is a close-up of the flower which I will explain below:
You wanna see what can be done with this darling little creation? Take a look:
I filled it with whatever candy I had on hand but it would be precious with some M&Ms in a matching color or even a handful of those pastel mint drops. These could be used as shower favors, table decorations, or even little gifties on Easter and Mother's Day. Have you identified the core container yet? It is just one of those clear plastic cups that hold SU embellishments. If you ever order buttons, brads, etc then you probably have a few laying around. SU also sells empty ones too.

All the materials I used are SU. That bottom scalloped circle is the Clear Circle Sizzix die which I cut with my Big Shot. Next, I wrapped a length of 5/8" Vanilla Grosgrain ribbon around the cup and secured with glue dots. I topped that with Marina Mist 1/4" Grosgrain ribbon. The top of the bonnet is made with a 2 1/2" circle Punch and the 2 3/8" Scalloped Circle punch. The patterned paper is from Springtime Vintage DSP featured in the new Occasions Mini catalog. I cut 2 extra lengths of the ribbon to create the tails which hang off the brim. They are attached separately rather than trying to wrap the whole ribbon to drape that way.

The flower looks like a lot more than it really is or took to make. I started by punching 8-5 petal flowers from Baja Breeze (5) and Not Quite Navy (3) CS (using the 5 Petal Flower punch). Then you crumble them up rather small and dampen them all over with a spray bottle of water. Let it soak in a bit and then uncrumple each flower. At this point, you should be able to pull the layers of CS apart on each petal.

While they are damp, pile them up and very carefully run your piercer through the middle of the stack. This hole is for a brad to secure the flower. I used an Antique Brass one from the Metallic Assortment but it doesn't show so you could use whatever you have. After the flower is all in a brad, you can shape it forwards...like a cup. Attach a glue dt to the back and stick it down to your bonnet, along the brim.

That tiny bud-like center of the flower is made by first punching a 1/2" circle which you set aside. Next, punch a 1 3/8" circle and then directly over the hole made by that, punch a scalloped circle (1 3/4"). This will give you a piece that is not much more than the scallops themselves. If you snip it, between 2 scallops, you can then straighten the piece out to a long strip. Gently roll this strip in your fingers until it is tightly coiled. Put a glue dot in the center of the reserved 1/2" circle and stick your coil to it. This holds the coil from unrolling. Another glue dot to the back and you are ready to drop it down in the flower. I will look into possibly making a tutorial for this flower as soon as possible.

The 2 leaves of the flower were first stamped with the Build A Blossom stamp set in Old Olive ink onto Pear Pizazz CS. Next, I punched them with the Create A Blossom punch. I attached them with glue dots. I embellished the hat with pearls from the Basic Jewel Pearls Assortment and a few 1/16" inch dots.

I hope you enjoy this project. I think it has many possibilities! :)

Thursday, April 1, 2010

Wow, Is She Ever Coming Back?

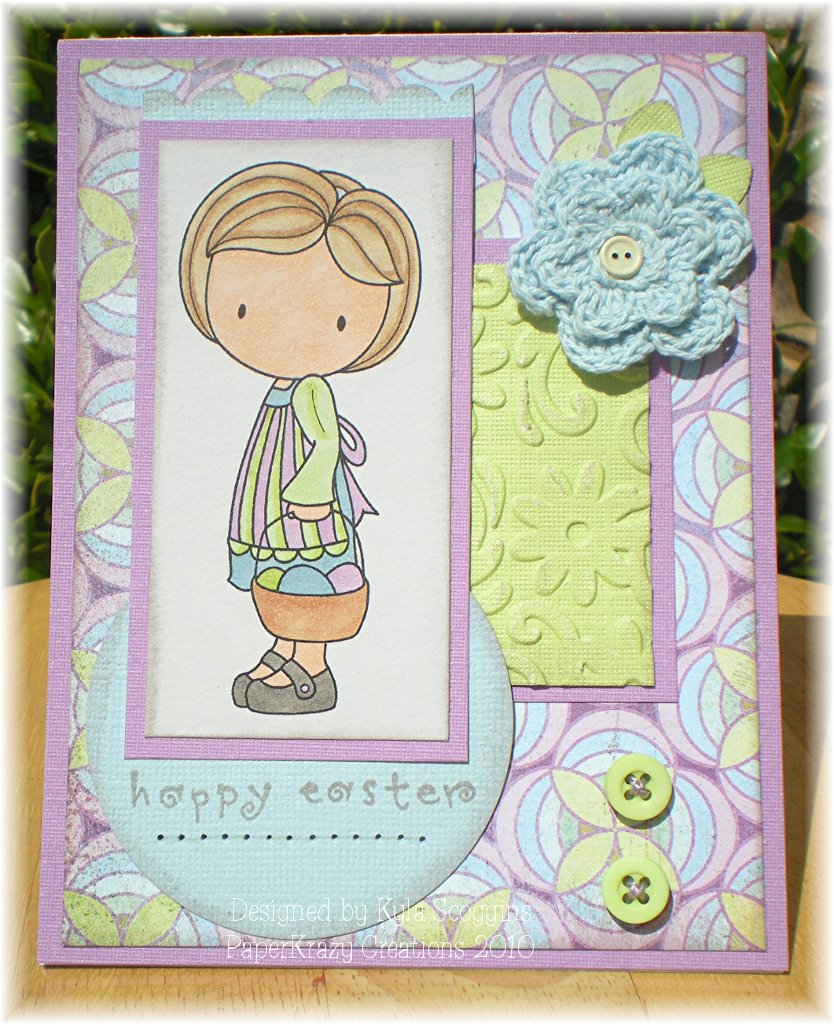
Hi guys! Did you think I left and never came back? Can you ever forgive me? I have been so busy getting my new Stampin' Up! business off the ground that I just haven't had time for my "therapy" cards. Ya know...the cards that I make for my much needed relaxation therapy. Haha! Anywho, I stopped by today with an Easter card I made a while back. It is listed in my Etsy shop as well. Wanna see?

As you may know if you stop by here more than once, I ADORE the Sugarplum images. Emma with her little basket is just too precious so she was my first choice for cute Easter cards this year. She is accented by the new Basic Grey line called Kioshi. I have to admit that the whole collection of papers did nothing for me when I saw it in a magazine weeks ago. When i saw it in my local Archiver's, I almost didn't recognize it! The colors are so much prettier in person. I think it is hard to get a feel for the scale of the patterns when you see it in an ad too. Anyway, I like how they work here. Emma is printed on a pale taupe card stock from Hobby Lobby. Stark white just didn't give me the right feel with that Basic Grey.

I have to run for now. I am judging a math tournament for my son's math club tonight so I have some things to get done before the start of Spring Break Friday morning. Oy! It is here already! They will be out of school before I know it! Have a great Easter weekend if I don't make it back before then. Happy Spring!

Papers- Basic Grey Kioshi Sayuri; Bazzill Jetstream CS; DCWV CS. Stamps- ATS digi image Easter Basket Emma; Stampendous happy easter. Inks- Tim Holtz Distress milled lavender & pumice stone. Tools- Sizzix lg floral flourishes emb folder; SU scallop border punch; sanding block; marvy clever lever 2.5" circ punch; EK paper shaper leaf punch; SU mat pack and piercer. Embellishments- MM 5th Ave brads; misc buttons; crochet flowers; DMC #3042 pearl cotton. Pens- Copics (YG13, YG11, E02, E31, E33, E35, W5, V01, V000, V12, B52, B91. SU- Sahara Sand marker.

Sunday, March 29, 2009

Here Comes Peter Cottontail...


and he brought a card! Nah, I would in no way attribute this card to the Easter Bunny himself. Surely, he could do a better job of it! ;)

Today's card is a quick card and my post will be quick too. We are off for a day with the kids so I need to run but I wanted to show you this card first. It is a simple one that I made for my kids to give to their little friends with some goodies. Here it is...

I used my new Fiskars apron lace edge punch. I love it! The brads, which my hubby called "rabbit rivets" as in "I like the rabbit rivets!", are by Making Memories. For the rest of the supplies, I will update this post later with a list. Thanks for stopping by! I hope the rest of your weekend is fabu!

Update: Here is my complete materials list. Sorry for the delay!

Papers- American Crafts Basket and Pat-A-Cake; blue DCWV CS. Stamps- Hampton Arts Easter Tree. Inks- Memento Tuxedo Black. Tools- Fiskars Apron Lace edge punch; SU ticket corner punch. Embellishments- MM bunny brads. Pens- Copic Y21, B23, RV13, G24, V15, N3.

Wednesday, March 25, 2009

Eggstra! Eggstra! Read All About It!

If I don't get the Corniest Blogger Award, who does? I mean, really? My hubby may take away my blog license if I'm not careful. Corny or not though, I have a card to show you and it's an Easter one. I had to hurry and snap a few pictures in between rain drops. We are getting another few days of rain! I can't complain though because GA is in a terrible drought and we have strict water restrictions. Maybe this rainy winter and spring will help us a little this summer when the mercury hits 100 degrees.

Enough about the weather...you came to see a card. You're in luck because I actually have one to show you! Like I said, it's an Easter card. I CASEd myself because I was in a hurry last night and I was fresh out of ideas. I made the original so long ago though, it may even be a copy of a design I saw somewhere on the web. I keep an idea journal and before I blogged, I didn't always put a name with the sketch. My own ideas and ideas I saw elsewhere got written down all together so I hope I am not claiming this one unfairly. Speak up if this sketch is your idea. I will gladly give you credit. Anywho, about the card...


The papers are Doodlebug from a few seasons ago. DB used to be one of my favorites and then they went a little off the beaten path with their products (IMO). No one needs coarse, sandy glitter on every sheet in a collection. "Sugar coating" is an understatement. I find their glitter to be way too rough and it comes off the paper just about EVERYWHERE. That being said, I still think their graphics are adorable and their older stuff is among my stash as the "hoarded favorite stuff."

My egg image is a Stampabilities (Hobby Lobby) wood stamp that I have had since Methusela got her hair done for prom. I love to color those stripes though! It is stamped on Gina K Pure Luxury. My sentiment was printed on my computer since I don't own any corny stamps such as this. ;) For the rest of my goodies, I made my list below. Thank you ever so much for coming out in the rain to read my blog! Oh...wait a minute...you...didn't...um...:D


Papers- Doodlebug Baby Girl Ribbon Stripe & Baby's Breath DSP; SU pink pirouette; Hobby Lobby textured lime green and lavender CS; Gina K Pure Luxury white CS. Stamps- Stampabilities striped Easter egg. Inks- Memento Tuxedo Black. tools- SU eyelet edge punch. Embellishments- clear dew drops by Robin's Nest. Pens- Copic (RV11, Y13, RV02, YG13, YG06, BV00, V12). Font- Whackadoo 16pt.

Friday, March 13, 2009

Easter Chickie, You're the One...

Easter is right around the corner and a little chickie stamp was sitting on my desk calling my name. He also told me to get on the ball and make an Easter card or 2 before it is too late. So here I am today, with a new card to show you. I used some papers from last Easter season but don't tell anyone that I am...behind...on using paper as I buy it. Shhh...don't tell. My chicken promised to keep it quiet too.

I loved the chick image as a focal point for the card so I kept my design very simple. The papers were from one, 2 sided sheet so I did my cutting of all panels at once and just flipped to the chosen side when I assembled my cards. Since it was such a breeze, I went ahead and made 3 others of the same design all at once so they are ready to go when Peter Cottontail comes hoppin down the bunny trail. The lace edging between papers is self adhesive paper ribbon by K&Co. The cute little buttons were left over from a package of fabric flowers I bought at Walmart a while back. Each flower included a brad and a tiny button for embellishment but they parted ways when the flowers immediately went on a thank you card last year. I included a simple sentiment of "Happy Easter" inside the card so it is pictured here...
So, you know the drill...supply list is below and I will list this little number in my Etsy shop within a few days. Thanks for stopping by and have a fantastic weekend wherever you are!

Papers- Imaginisce For Peep's Sake Pretty New Dress; misc pale teal CS. Stamps- Imaginisce For Peep's Sake Chick; Studio G Happy Easter. Inks- Tsukineko Graphite Black Brilliance; SU Blue Bayou. Tools- piercer; corner rounder; Nestie Lg Classic Scalloped Square. Embellishments- K&Co adhesive paper ribbon in Smitten White; Best Occasions buttons; Sm pink rhinestones by the Beadery. Pens- Copic W1, Y21, R32, B01, BG10, YR65, blender.